How to Install Windows 7 to NVMe SSD
Contrary to the popular belief, Windows 7 can be installed to modern hardware like NVMe and Optane solid state drives — and it will be fast on these storage devices, much faster than Windows 10/11. It just needs proper drivers.
This article explains how to avoid "No drives were found" warning during installation of Windows 7 to NVMe solid-state drive.
| Contents |
1. Symptoms of the problem
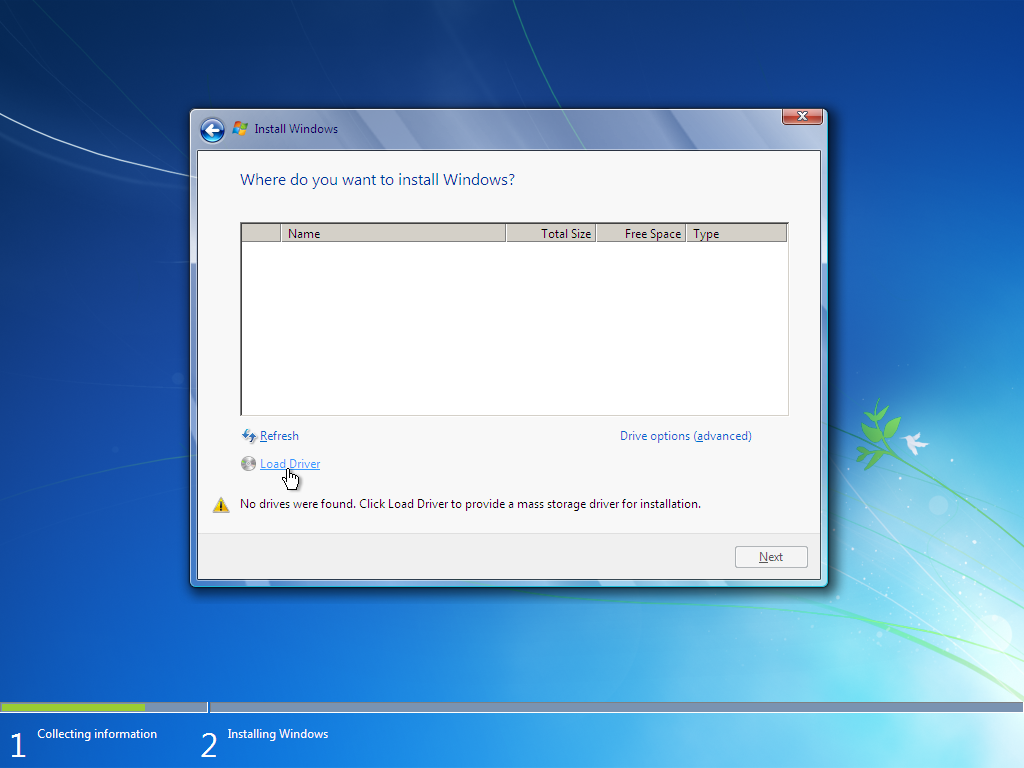
During Windows 7 installation to NVMe solid state drive the following warning appears:
No drives were found. Click Load Driver to provide a mass storage driver for installation.
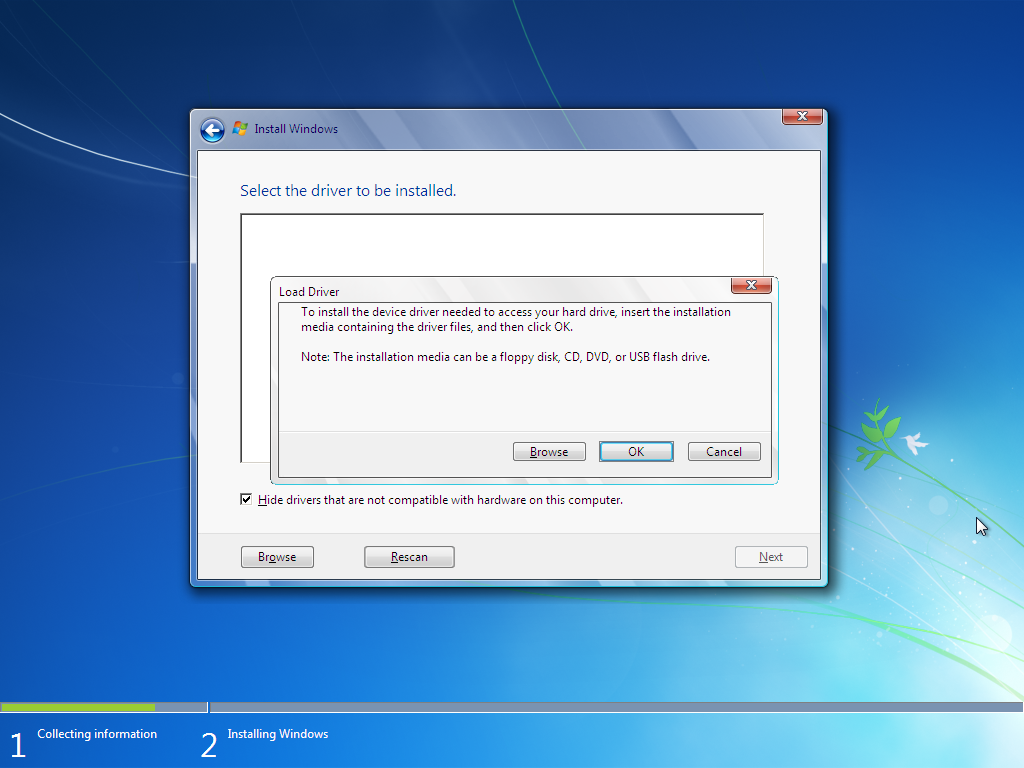
After clicking "Load Driver", the following message is displayed:
To install the device driver needed to access your hard drive, insert the installation media containing the driver files, and then click OK.
Note: The installation media can be a floppy disk, CD, DVD, or USB flash drive.
2. Solution — Method #1
Download driver files from vendor of your NVMe solid state disk and put them to USB thumbdrive.
At the very minimum, you need to have .sys, .inf and .cat files on your USB thumbdrive.
Then USB thumbdrive with driver files should be supplied to Windows setup as required.
You must not have any .exe or .zip files on your USB thumbdrive. If there are any .exe or .zip files on USB thumbdrive, then you are doing it wrong and drivers in such form will be outright rejected by Windows setup.
Please note that you need to download and provide drivers for the same version of OS
you are installing. Usually drivers for older OS version are compatible with new OS version.
E.g. if you are installing Windows 7, then drivers for Windows 7 will be a perfect match,
drivers for Windows Vista also will do, and drivers for Windows 10/11 simply won't work.
It is especially important not to intermix driver and OS bitness. If you are installing 64-bit Windows, then you must provide 64-bit drivers. If you are installing 32-bit Windows, then you must provide 32-bit drivers. For certain subset of .inf files, Windows is not able to detect wrong bitness of the driver and relies on your honesty and attentiveness.
3. Solution — Method #2
If previous method didn't work, then you need to integrate NVMe SSD driver into Windows setup image. Some of NVMe drivers are boot-class only, it means they must start simultaneously with Windows kernel, before Windows GUI is loaded. This applies to Windows Setup GUI as well.
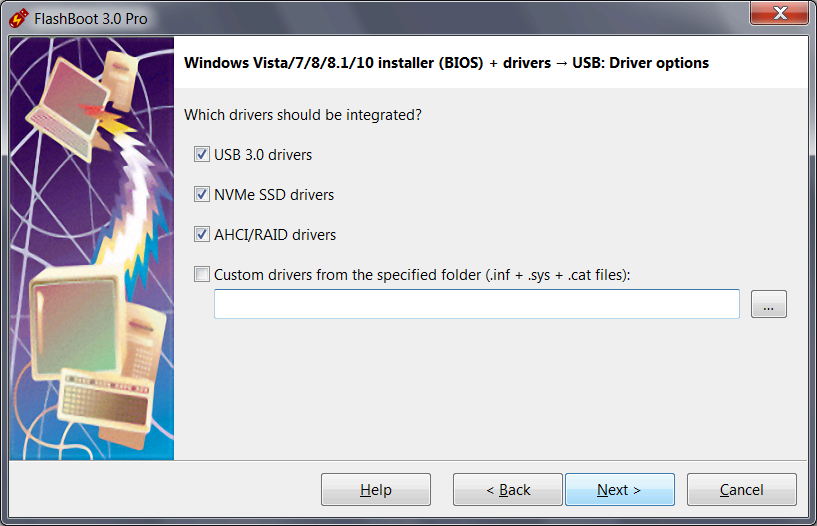
Just use FlashBoot Pro. FlashBoot will prepare Windows installation USB thumbdrive with slipstreamed drivers, so you can quickly and easily install Windows 7 to any new computer, even on the NVMe SSD.
FlashBoot will automatically detect target Windows bitness and version, and slipstream only matching drivers. FlashBoot contains big collection of builtin USB 3.0, NVMe and RAID drivers. Besides that, FlashBoot can also slipstream user-supplied drivers.
4. How to extract .sys, .inf and .cat files from driver installation .exe file
If you are sideloading NVMe/RAID driver via USB thumbdrive during Windows 7 installation, or if you are integrating custom (not FlashBoot-builtin) driver to Windows 7 installation media using FlashBoot Pro, then you need to provide the driver in form of .sys, .inf and .cat files. But what if your hardware manufacturer provides only .exe file (or .exe file enclosed in .zip file) for download?
You can extract .sys, .inf and .cat files from driver installation .exe file in the following way:
- Get 32Gb or larger USB thumbdrive.
- Prepare full-featured Windows 10/11 on USB thumbdrive using FlashBoot Free.
- Boot Windows 10/11 from USB thumbdrive on the same computer where NVMe or RAID device is installed.
- Prepare desktop shortcut to C:\Windows\System32\cmd.exe with run as administrator option enabled.
- Save list of folders in C:\Windows\System32\DriverStore\FileRepository.
To do this, run the following command in the command prompt:
(please note: disk C: in this context is bootable USB thumbdrive).dir /a:d /b C:\Windows\System32\DriverStore\FileRepository > C:\drvlist_before.txt - Download and install driver .exe file from the website of your hardware manufacturer. Please pay attention: you need to download and install driver for Windows 7, not Windows 10/11. Drivers for Windows 7 can be installed under Windows 10/11, but not vice versa.
- Again, save list of folders in C:\Windows\System32\DriverStore\FileRepository.
To do this, run the following command in the command prompt:
dir /a:d /b C:\Windows\System32\DriverStore\FileRepository > C:\drvlist_after.txt - Compare contents of DriverStore file repository before and after driver installation:
New folder appeared after driver installation, note its name here.findstr /V /G:C:\drvlist_before.txt C:\drvlist_after.txt
(Here is a sample output. For your driver, this folder will have a different name.)iastorac.inf_amd64_neutral_47ebd65d436e75d0 - Copy .sys, .inf, .cat and other files from the folder which you have noted on the previous step, e.g. C:\Windows\System32\DriverStore\FileRepository\iastorac.inf_amd64_neutral_47ebd65d436e75d0. If there were multiple new folders in DriverStore file repository, then copy .sys, .inf, .cat and other files files from multiple folders. Copied driver files should be put to separate small USB thumbdrive.
- Bootable USB thumbdrive with Windows 10/11 and installed drivers can be reformatted and reused for other purpose now.
5. Case study: Samsung NVMe SSD and Intel RSTe RAID
Samsung NVMe SSD controller and Intel RSTe RAID controller (C600+ and C220+ series chipset) represent a special class of devices. These devices are fully compatible with Windows 7 and Windows 2008 Server, but correct integration of their drivers into Windows Setup is possible only with FlashBoot Pro and totally not possible using other driver integration tools.
This is because of a bug in Microsoft Windows offline servicing stack and Setup API. More specifically, after non-FlashBoot integration of the specified drivers, UpperFilters and LowerFilters registry values under HKEY_LOCAL_MACHINE\SYSTEM\CurrentControlSet\Control\CriticalDeviceDatabase registry key are clobbered with unexpected data from the registry key of unrelated device class.
Unlike other driver integration tools, FlashBoot Pro does not use Microsoft Windows offline servicing stack and Setup API, so does not inherit aforementioned bug.
| About us | Partners | Contact us | Privacy policy |