Solving This PC Can't Run Windows 11 Problem
If your computer does not have TPM chip, has less than 8 GB of RAM, or its firmware does not support Secure Boot feature, you will encounter "This PC can't run Windows 11" problem during the installation of Windows 11.
But there's a workaround. To solve this problem, you need to tweak a few registry keys in the Windows preinstallation environment. This article explains which registry keys exactly need to be tweaked and how to do it.
| Contents |
1. Symptoms of the problem
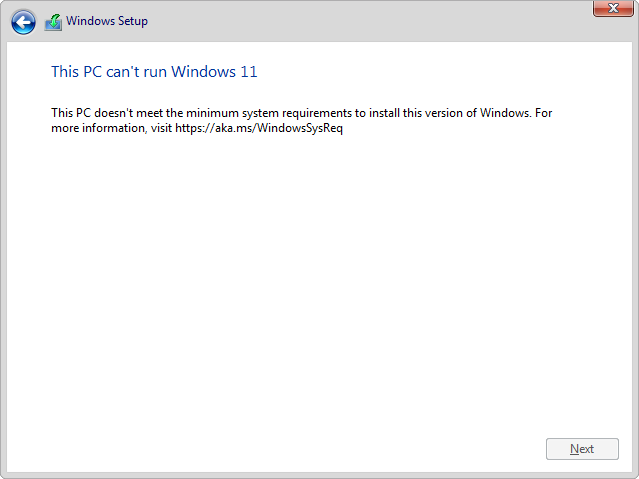
During the installation of Windows 11 to your computer the following error occurs:
This PC can't run Windows 11
This PC doesn't meet the minimum system requirement to install this version of Windows. For more information, visit https://aka.ms/WindowsSysReq
2. Solution in a nutshell
Windows preinstallation environment has its own Registry. These Registry hives are stored separately from actual Windows Registy hives which are going to be installed to the target HDD/SSD (sources\boot.wim vs sources\install.wim or sources\install.esd).
To bypass hardware requirements checks, you need to add one or more of the following registry values to the HKEY_LOCAL_MACHINE\SYSTEM\Setup\LabConfig registry key of the Windows Setup (all of these registry values have REG_DWORD type):
| Value Name | Value Data |
| BypassTPMCheck | |
| BypassRAMCheck | |
| BypassSecureBootCheck |
3. Method 1: Console commands in Setup
After booting from Windows 11 Setup media, before clicking the Next button on the first screen, press Shift+F10 to open console window and enter the following commands:
reg add HKLM\SYSTEM\Setup\LabConfig /v BypassTPMCheck /t REG_DWORD /d 1
reg add HKLM\SYSTEM\Setup\LabConfig /v BypassRAMCheck /t REG_DWORD /d 1
reg add HKLM\SYSTEM\Setup\LabConfig /v BypassSecureBootCheck /t REG_DWORD /d 1
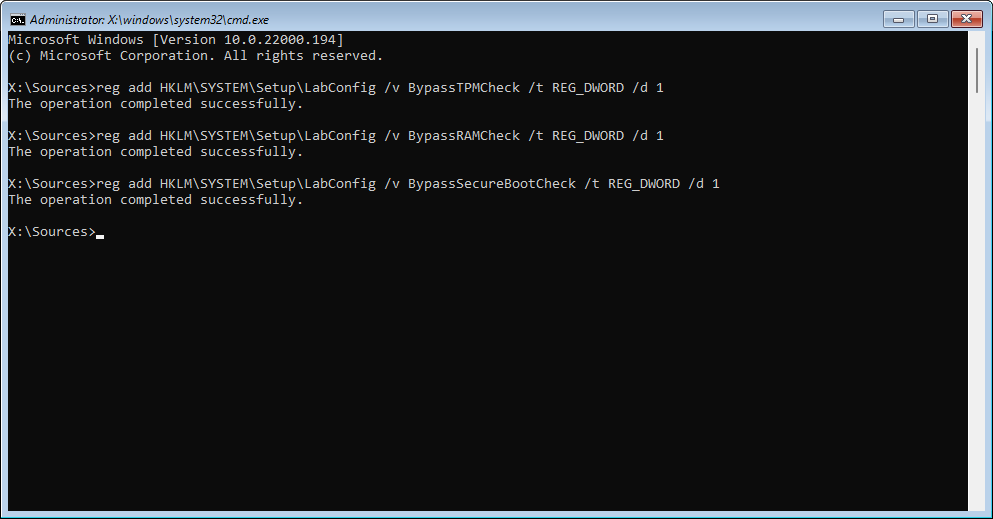
Some of the above commands may be skipped, as appropriate for your hardware.
Then close console window (or enter exit command) and continue Windows 11 Setup as usually.
4. Method 2: AutoUnattend.xml in root folder
Before booting from Windows 11 installation media (USB thumbdrive or DVD disc), create a new text file named AutoUnattend.xml in the root folder of Windows 11 installation media with the following contents. Edit bold text as necessary for your hardware:
<?xml version="1.0" encoding="utf-8"?>
<unattend xmlns="urn:schemas-microsoft-com:unattend">
<settings pass="windowsPE">
<component name="Microsoft-Windows-Setup" processorArchitecture="amd64"
publicKeyToken="31bf3856ad364e35"
language="neutral" versionScope="nonSxS"
xmlns:wcm="http://schemas.microsoft.com/WMIConfig/2002/State"
xmlns:xsi="http://www.w3.org/2001/XMLSchema-instance">
<RunSynchronous>
<RunSynchronousCommand>
<Order>1</Order>
<Path>cmd /c for %a in (TPM RAM SecureBoot) do
reg add HKLM\SYSTEM\Setup\LabConfig /t REG_DWORD
/v Bypass%aCheck /d 1 /f</Path>
</RunSynchronousCommand>
</RunSynchronous>
<UserData>
<ProductKey>
<Key></Key>
</ProductKey>
</UserData>
</component>
</settings>
</unattend>
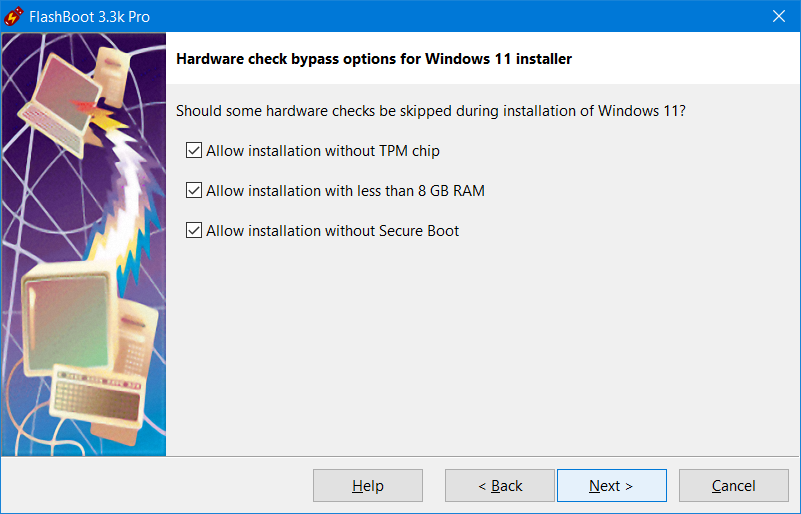
5. Method 3: FlashBoot Free
Using FlashBoot Free, you can prepare Windows 11 Setup media with these modifications permanently baked in to the Setup Registry. Starting from version 3.3k, FlashBoot displays the following page when preparing Windows 11 installation USB thumbdrive (by default, all these options are unticked):
| About us | Partners | Contact us | Privacy policy |